Atacama Desert - Rush DefenseDisclaimerThis is a NEW MAP! Therefore, our strategies are limited and this map needs to be addressed in terms of rush strategies, so here we are! Also, please find that all the zones of Atacama Desert can be found near the bottom of this tactics guide.
I've taken the liberty of exploiting EA DICE's BC2 War Room functionality on their home website to create these maps with symbols. Feel free to use the pictures both here and at the bottom for your use in other strategies; I want to see this thread filled with discussion for this map.
IntroMen, welcome to Atacama Desert on Rush! Here we have the whole overview of the map. This one dreaded map as attackers can come from all directions from far ranges! Defenders, steel yourselves against the foe not just from foot, but as armor and air!
Atacama as a defender cannot be taken lightly. As you can see, Atacama is divided up into four separate zones. I will only be discussing Zone 1 as my experience shows that Zone 1 is held the best against the enemy.
Figure 1: Atacama Desert can be seen here.
![[Tactics] Atacama Desert Rush - Defense AtacamaZ1](https://2img.net/h/i857.photobucket.com/albums/ab131/ajamoreno/AtacamaZ1.png)
Atacama Desert's layout is fundamentally the same as it would be in Conquest. However, the choice attack helicopter is not a Havoc or an Apache, but rather a 4-person Hind. It lacks the firepower or maneuverability as the other choppers and is typically easier to shoot down via tracer-rocket combos or the VADS found in each zone.
Note: The VADS is a new anti-air emplaced weapon. It is a vast improvement on the ZU-23 AA weapon as it can be described as a UH-64 Blackhawk's minigun. It does SO MUCH DAMAGE SO QUICKLY! It even alter's an aircraft's vector of flight so that a helicopter could be charging you one moment then it could be veering off course the next moment. It is of paramount importance that when on defense that you control these emplacements ASAP!
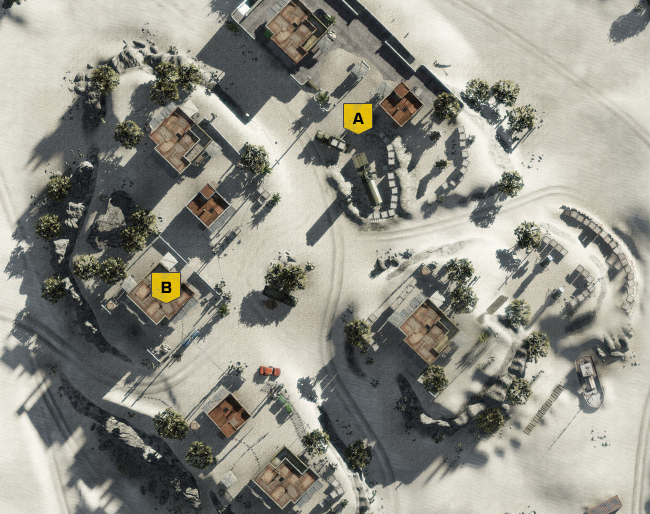
Zone 1 - What the attackers see.Figure 2: Atacama Desert Z1 for the Attackers
![[Tactics] Atacama Desert Rush - Defense AtacamaZ1Attackers](https://2img.net/h/i857.photobucket.com/albums/ab131/ajamoreno/AtacamaZ1Attackers.png)
As you can see, the Attackers have a plethora of choices for assaulting Zone 1 base. As a defender looking at the Attacker's base, the left flank or the beach/water side confers a couple of main attack routes with a stairway leading up to the VADS. These routes need to be closely monitored.
The right flank as depicted on the left of the map shows that there are few more choices for the attacking team to flank the defending team. MCOM B is also very susceptible to flanking and destruction as it is collapsible! Be war of the sniper dunes to the right of B.
The main approach is the most direct way into the base as it must also pass through the forward base. Mines should be placed in the forward base but not much else should be going on there. There is a choke point for fast-movers between the forward base and the main base. You should plan on placing mines there.
A strong defense and perimeter on or around the yellow lines should do well against the attackers.
Light green dots depict gun emplacements, please take note of the VADS for Zone 1 is on top of a green construction building just North of MCOM A. MCOM A is in an open area and is relatively easier to defend than B as there is no immediate threat should a building collapse.
Keep note of the very many sniper positions denoted as blue dots in the expanse between the forward base and the attacker's base.
Zone 1 - What the defenders see.Figure 3: A simple battle plan against the attackers.
![[Tactics] Atacama Desert Rush - Defense AtacamaZ1Defenders](https://2img.net/h/i857.photobucket.com/albums/ab131/ajamoreno/AtacamaZ1Defenders.png)
This map overlay shows viable locations for mining. Enemy staging areas should be checked often by all teammembers as these are important grounds for preparing and launching an attack on the base.
Please note the light green dots are emplacements. They are Heavy MGs unless otherwise noted. NOTE: It isn't marked, but there is also an Auto GL just north of MCOM B.
Attackers like to flank directly behind the Zone 1 base and stay in buildings to wait for their teammates to spawn. Recons with sensor balls will be essential to covering this expanse of a base.
The three stairs from the desert sands also leave the area around the VADS extremely valuable real estate therefore a VADS operator should have 1-2 people nearby for back up.
MCOM A can be easily surrounded by both friend and foe, keep this in mind while defending. MCOM B on the other hand is susceptible to instant destruction.
A tight perimeter around both MCOMs while manning the emplacements should provide a solid defense in Zone 1 of Atacama Desert Rush.
_____________________________________
Atacama ZonesThese are templates of Atacama Desert Zones 2-4. Please USE THESE when you are making descriptions. Pop them in GIMP, Paint, photoshop, whatever!
Zone 2 Zone 3
 Zone 4 - CloseUp
 Zone 4 - Far


