The first issue of the 13th MEU Playbook will be covering the Gulf of Oman. A large map that can leave troops spread out, and heavy use of vehicles and air support are a must. All information posted is open to discussion, and feel free to add on your own tactics. Please, no stealing from anyone who posts information on this thread, give credit where credit is due. Now, lets get into the starting offensive.
LIFT OFF:Like the start of any game, you need to be up and moving to either get those flags first or to slow the other team down from doing so. Here are a couple offensive start plays I have designed-
COBRA STRIKE offensive[US]
The first phase is in red. To the left, you wanna get a fully loaded transport chopper headed to B. Best to have an attack chopper infront first to make the way clear. You drop off a couple guys there to grab that flag. Try to maintain cover by the train, looking for enemy vehicles coming, then you get on that rocket and fire it off. The transport chopper shouldn't have to stop as the two men parachute down. Then, fly over to the left side of D and have one guy on first floor, followed by the two others moving there way up. The reason grabbing B and D in such an early swoop will help you make sure those AA guns are not shooting down your planes, but theres, so get on those rockets.
The rest of the squad, grab those boats, and hit A hard, the RU might already be dropping in to take the flag from ya. Once you got A, grab that tank and APC and hit towards B for support first, if enemy forces are hitting C, thats your call to send one vehicle to C.
It is a risky move since you have that small squad taking two bases into hard incoming enemies, but I say go for it.
SPREADHEAD offensive[US]
As always, get off quick, because this one requires a hard straight push. The jets and choppers move, with one of the choppers sweeping through B and D to try and slow them down. All other forces straight to A. From A, have the tank and APC push to C, but get a humvee to sweep around the far right side to the gas station, to keep enemies from using that rocket launcher on the vehicles. If you feel well put with your resources, Push to D is what I recommend first, or B depending on the battles situation. Your forces are well grouped so hitting strong while being able to defend the other points should be easy.
The risk is having less control over the AA guns, so you risk getting your air support taken down.
COBRA STRIKE OFFENSIVE [RU]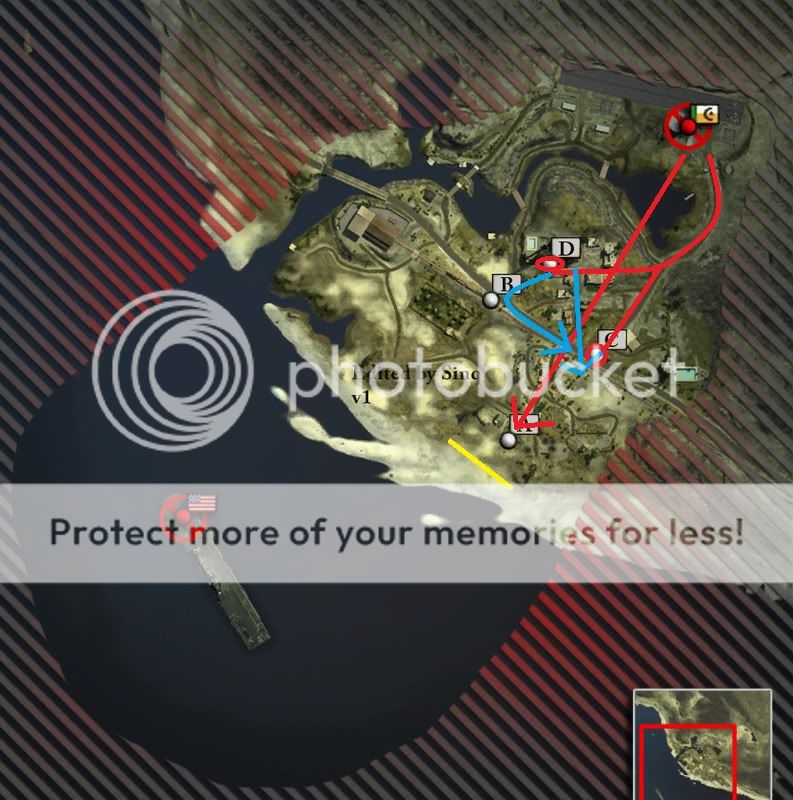
Now the main thing to do, is send a fully loaded transport following an attacking chopper, to point A. Delaying this point is important, because this is where the US gets more ground vehicle support. So get a strong force to hold off the enemy. Now to sweep the other flags while your fighting A. Don't underestimate the value of those transport vehicles because they are fast to get to flags. So sweep through to C and D. I recommend sending the APC you start off with towards C. Once you secure D though, don't forget to get on that AA gun, and get that tank that pops up in back to either sweep to B if needed, or push down the middle. If well played, you should have at least 3 of the bases secure with enemy ground and air forces struggling.
Risks are having enemies sweep through to B, or your forces holding back A being grabbed taken out too soon, leaving you at higher risk while grabbing other flags.
SNAPPING TURTLE offensive[RU]
Its not a fast push, but you will pull a strong line. What you need to do is get your troops to D and B, with your APC pushing C. When securing D, remember, get that AA, and grab that tank and push down the middle to either C or B, most likely C because that where enemies ground vehicles come in. At B, get on that AA, also, grab a small force in humvee to push towards A on the far left, a route not many enemies usually look for, because they are pushing to C.
Risks are the enemy will obtain there ground vehicles, so you must look out for those when they push to C.
FLAG FOR FLAG, TACTICS TO GRAB:For best performance, get a good team of at least 3.
Red usually means main movement
Blue usually means secondary tactic
Purple represents optional vehicle support route
Yellow represents enemy forces
Black represents good long range/sniper areas
A TO C -

Now, its usually best to have a good armored vehicle that pushes straight to C for this one, but also a good couple troops could hold the flag, but remember, try to use the cover of the nearby rock and wreckage, don't stand in the open right next to the flag, because the enemy holding the flag spawns at the gas station and can pick you off. I usually think having even a single man sweep around the right side in a humvee or on foot even, to take out troops trying to fire at your teammates grabbing C is a good idea.
A TO B -
Now using a humvee is higly recommended when first heading there, because a sniper can try and pick you off from the train. Also, calling in air support is good to bomb through. If having ground vehicle support, lookout for that rocket right infront of the B flag. Now when moving your foot soldiers, get out of that humvee when near that brick wall side, or drop off a soldier there, to push along the side of the train from forces hiding in there so they don't flank around on your team at the flag. Also, look out for enemies in that little shack just north of the flag, they can pop outta there too. If you have D, try to get a vehicle to push from that side while you hit the southside. It causes confusion and thats how you want your enemies.
B TO D -

Now grabbing this flag with foot soldiers is best, because those high buildings leave heavy vehicles open to nades and being shot from hidden spots. If you feel you can use vehicle support to take the base, then go for it. Now the risky part of this flag capture is snipers when running in that open area infront of B. So be quick to dodge, or have your own sniper support call out enemy snipers from the train. Flanking around on the left side, there is a stair case, take it, go around the back of that building. Now look out for snipers on the side of the construction building, use that building and lumber for cover. If you have a few guys, have one or two take the ladder from the back side, while one or two pushes from the first floor, inside and up. Optional is also having a teammate flank around when leaving B to the right, and going up to the frontside of D, with plenty of tree cover and buildings when getting there. U can assault from the ground, or take that ladder that will lead you to be face to face with enemies in the building.
There is a river you can take if you have boat access, to the back of D, which is rarely used.
B TO A -

You rarely see people push from B to A. So you get a buggy or jeep or whatever, and you move forward. taking A from the more frontside can let you use the buildings as cover for advancement. But taking a far right route if able to pull it off, lets you also strike unexpected. Snipers can get around over that hill area and pop enemies. Always look for enemy vehicles just sitting at A. rush to grab them from the enemy if you can. Use the building sitting in the A base for cover while taking the flag. Vehicle support can come straight upfront, or from the side which I recommend.
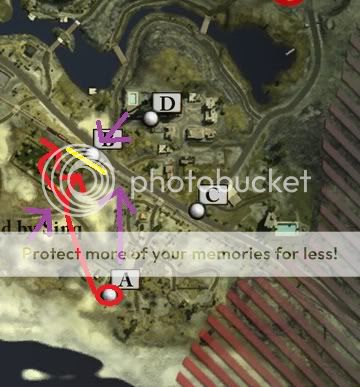
D TO C -

Pay much attention to that black circle. putting a sniper up there while getting ready to strike C, is great. Don't attack though till your forces have moved to the fence line just to the slight backside of the gas station, or as the blue shows, around to the side of the C flag. Be careful though when attacking the gas station then moving to the C flag, because enemies spawn at the gas station when holding C, so you could be shot down from behind. If getting vehicle support, it is best recommended, having it come down from the back part of C, from either D or the RU base. it will allow some cover from the rocket launcher at the gas station, till you know it is clear to advance the vehicle. watch out for a possible sniper on top of the hotel, which is the building I have circled in yellow.
D TO B -

The blue route is the riskier one, because shooters from the train can take you down if your not careful. The red route is usually better because forces from the train won't identify you right away. The black circle though is a good place to have a sniper for cover when advancing. Also, vehicle support is great here, but watch out for that rocket right next to the B flag.
C TO D -

Now usually, people push directly through the buildings to the front angled side of the construction building where the D flag is. I recommend taking it to the right, around the far buildings, to the back left side of D, and move up and clear the building. Having a sniper though as cover and distraction ontop of the circled building is a great help. Vehicle support isn't recommended because as said, it will be vulnerable there. If using. don't place it directly next to the flag, where the enemies can drop down or shoot explosives at ya. without you being able to aim up at them.
C TO A -

Flanking around to the side is a good route. using a fast vehicle is recommended. the trees and hills can provide cover. Having a sniper to the rightside is always good for picking people off. Or you can take the direct front route. using the buildings as cover, then flanking around the base. Using vehicle support is good. but don't push directing through the front, flank around on A, and look out for enemy vehicles.
B TO C / C TO B -

Using vehicles along the train track way is always a good direct route to take, but look out for the rocket launcher infront of B. Foot soldiers should try to use the buildings farther south of D as cover. The black circled areas are always good for far shooting.
FLAG DEFENSE -

All lines of red keep covered, green dots represent good places for mines. Its very often Idiots will drive right up next to the flag when taking it, so placing mines right around is always works. I'm sure there are many other good mine areas, but not my area of expertise lol The black circles once again, good sniping areas. Either on top of D, or on the crane next to D. the building between D and C. The hotel at C, and the open traincart at B.
REMEMBER:Use those AA guns, having air support is crucial
Check the airfield if on RU, or ship if on US, for vehicles to use every once in awhile. Never let your resources go to waste.
Point out where enemy vehicles and forces are, it will let your air support know where to make it rain, or your ground forces where to pound it. Let people know about snipers as well/
Don't try to be a one man army, you may be good at killing, but thats not how you win this game. Communication and tactics.